使用说明
同班 Cohorta 使用说明
适用于 0.6.0。从安装到让 Agent 跑起来,再到审批、流程和定时任务。界面名称以驾驶舱里显示的为准。
五分钟上手
- 安装并打开驾驶舱。左下角显示「本地服务在线」就是准备好了。
- 跑一次本地演示。在「工作台」点「运行本地演示」。它用独立的演示身份打开本地页面,填写、验证并保存截图。不登录账号、不发布内容,也不调用大模型。
- 新建身份。「身份」→「新建身份」,填名称、选设备模板、贴一行代理,在「我是谁 / 接下来做什么」里写清楚这个号的用途。
- 交给 Agent。重新打开终端,在 Claude Code、Codex 或 Cursor 里说:「用 seller-eu-1 打开后台,导出今天的订单」。也可以在驾驶舱的「创建任务」里直接下达。
- 看、批、接管。「运行」里看实时画面。发帖、付款、提交表单会停在「需要你处理」,你批准后才继续。需要时点「接管」自己操作,用完「交还」。
- 固化成流程。跑通的任务存成流程,验证并发布后,回放不再调用模型。可以对一组身份批量跑,Pro 还能定时跑。
Quick start
- Install and open the cockpit. When the bottom left says “Local service online”, it is ready.
- Run the local demo. On the Workbench, click “Run local demo”. It opens a local page with a separate demo identity, fills it in, checks the result and saves a screenshot. It signs in to nothing, publishes nothing and calls no model.
- Create an identity. Identities → New identity. Give it a name, pick a device template, paste a proxy line, and say what the account is for under “Who I am / what next”.
- Hand it to an agent. Open a new terminal and tell Claude Code, Codex or Cursor: “Open the admin page with seller-eu-1 and export today’s orders.” You can also start it from New task in the cockpit.
- Watch, approve, take over. Runs shows live windows. Posting, paying and submitting forms stop under “Needs you” until you approve. Click Take over to drive yourself, and “Hand back to agent” when you are done.
- Save it as a flow. Save a task that worked as a flow (recipe). Once it is validated and published, replays call no model. Run it across a group of identities, or on a schedule with Pro.
5 分で始める
- インストールしてコックピットを開く。左下に「ローカルサービス稼働中」と出れば準備完了。
- ローカルデモを 1 回実行する。「ワークベンチ」で「ローカルデモを実行」を押す。デモ用の別の身分でローカルページを開き、入力・検証してスクリーンショットを保存する。アカウントへのログイン、投稿、モデル呼び出しはしない。
- 身分を作る。「身分」→「身分を新規作成」。名前を付け、デバイステンプレートを選び、プロキシを 1 行貼り、「自分は誰 / 次に何をする」にこのアカウントの用途を書く。
- Agent に任せる。ターミナルを開き直し、Claude Code・Codex・Cursor に「seller-eu-1 で管理画面を開いて今日の注文をエクスポートして」と伝える。コックピットの「タスクを作成」から直接頼んでもよい。
- 見る・承認する・交代する。「実行」でライブ画面を見る。投稿、支払い、フォーム送信は「対応が必要」で止まり、承認するまで進まない。必要なら「引き継ぐ」で自分が操作し、終わったら「agentに返す」。
- フローにする。うまくいったタスクをフロー(recipe)として保存する。検証して公開すれば、再生時にモデルは呼ばれない。身分のグループで一括実行でき、Pro なら定期実行もできる。
安装
在下载区选你的系统。每个文件都附 SHA-256。安装包已经内嵌 Python 和本地服务,不用另外安装。
macOS
Apple 芯片选 aarch64.dmg,Intel 选 x64.dmg。打开 .dmg,把 Cohorta 拖进「应用程序」。安装包还没有做 Apple 签名,第一次打开会提示无法验证开发者:在「应用程序」里右键 Cohorta,选「打开」,再点「打开」。也可以到「系统设置 → 隐私与安全性」点「仍要打开」。
Windows
.msi 和 -setup.exe 二选一。SmartScreen 拦截时,点「更多信息」,再点「仍要运行」。
Linux
Debian / Ubuntu:sudo apt install ./Cohorta_0.6.0_amd64.deb。其他发行版:chmod +x Cohorta_0.6.0_amd64.AppImage,然后直接运行。
核对文件
macOS / Linux:shasum -a 256 文件名。Windows PowerShell:Get-FileHash 文件名。结果和下载区的 SHA-256 一致再打开。
只想在自己的代码里调用浏览器库,不需要驾驶舱:用下载区的「复制 pip install 命令」。
Install
Pick your system in the download section. Every file lists its SHA-256. The installers already include Python and the local service, so there is nothing else to install.
macOS
Use aarch64.dmg on Apple silicon and x64.dmg on Intel. Open the .dmg and drag Cohorta into Applications. The app is not signed by Apple yet, so the first launch says the developer cannot be verified. In Applications, right-click Cohorta, choose Open, then click Open again. You can also click “Open Anyway” in System Settings → Privacy & Security.
Windows
Use either the .msi or the -setup.exe. If SmartScreen blocks it, click “More info”, then “Run anyway”.
Linux
Debian / Ubuntu: sudo apt install ./Cohorta_0.6.0_amd64.deb. Other distributions: chmod +x Cohorta_0.6.0_amd64.AppImage, then run it.
Check the file
macOS / Linux: shasum -a 256 FILE. Windows PowerShell: Get-FileHash FILE. Open it only if the result matches the SHA-256 in the download section.
If you only want the browser library in your own code and not the cockpit, use “Copy pip install command” in the download section.
インストール
ダウンロードで自分の OS を選ぶ。各ファイルに SHA-256 を載せている。インストーラには Python とローカルサービスが入っているので、追加のインストールは要らない。
macOS
Apple シリコンは aarch64.dmg、Intel は x64.dmg。.dmg を開き、Cohorta を「アプリケーション」にドラッグする。まだ Apple の署名がないため、初回は「開発元を確認できません」と出る。「アプリケーション」で Cohorta を右クリックして「開く」を選び、もう一度「開く」を押す。「システム設定 → プライバシーとセキュリティ」の「このまま開く」でもよい。
Windows
.msi か -setup.exe のどちらか一方を使う。SmartScreen に止められたら「詳細情報」→「実行」を押す。
Linux
Debian / Ubuntu:sudo apt install ./Cohorta_0.6.0_amd64.deb。その他のディストリビューション:chmod +x Cohorta_0.6.0_amd64.AppImage の後に実行する。
ファイルを確認する
macOS / Linux:shasum -a 256 ファイル名。Windows PowerShell:Get-FileHash ファイル名。ダウンロード欄の SHA-256 と一致してから開く。
コックピットは不要で、自分のコードからブラウザライブラリだけ使いたい場合は、ダウンロード欄の「pip install コマンドをコピー」を使う。
第一次打开
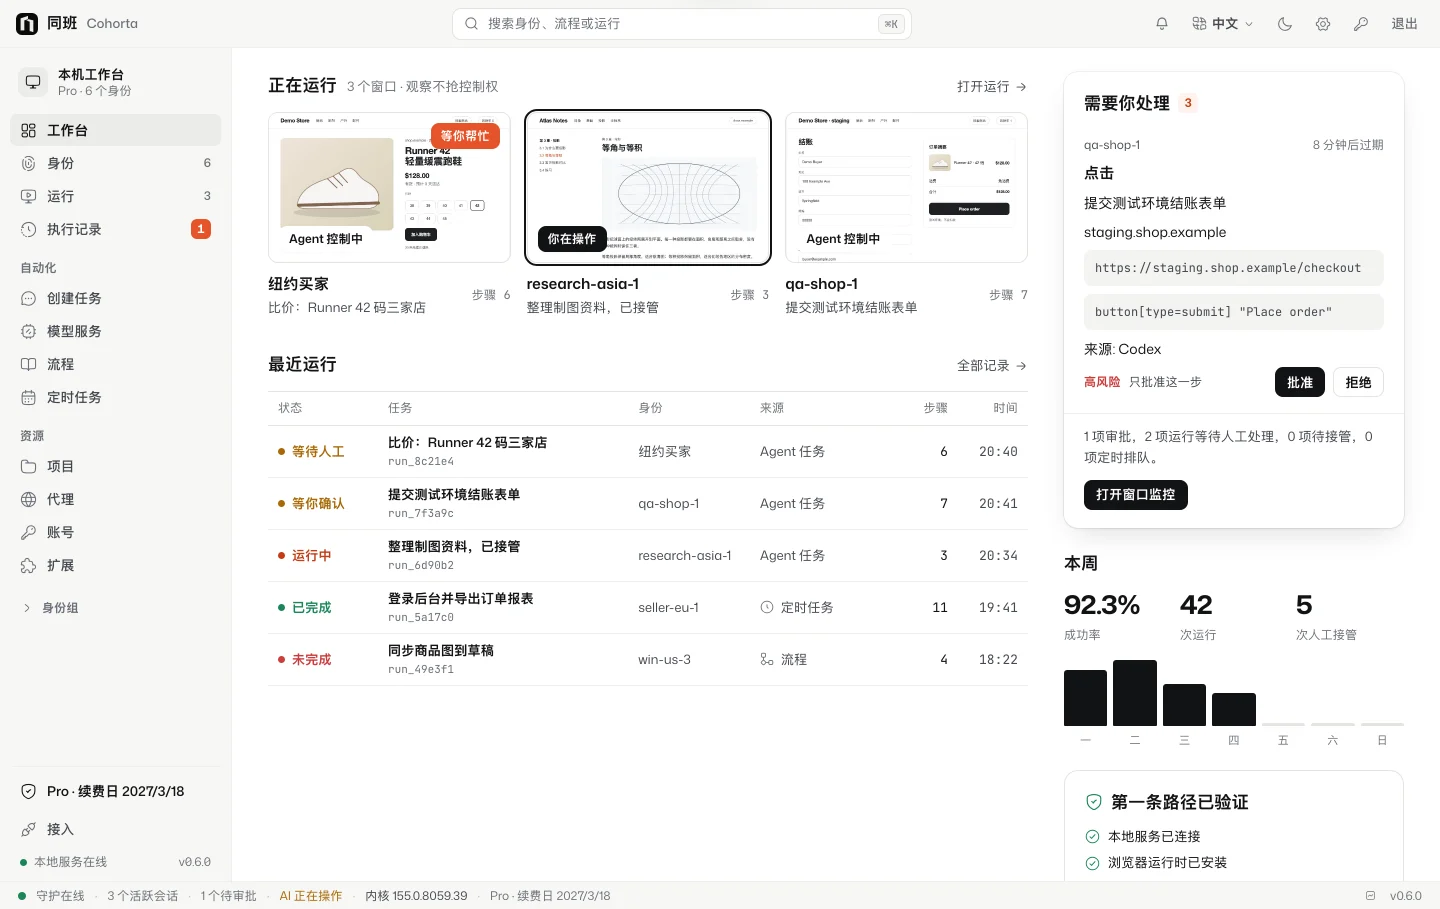
- 打开驾驶舱后,本地服务会自动启动,只在本机
127.0.0.1:27933监听。左下角显示「本地服务在线」。 - 在工作台「接下来做什么」里点「运行本地演示」。通过后会显示「第一条路径已验证」,说明本地服务、浏览器运行时和截图都正常。
- 浏览器内核:Windows 和 Linux 安装包自带 Clearcote 开源内核,装好就能开窗口。macOS 第一次打开窗口时,由你的电脑从 CloakHQ 官方渠道下载 CloakBrowser 并校验签名。
- 登录后,可以在「接入 → 浏览器内核」里安装同班自己的 Cohorta 155 内核(基于 Chromium 155)。
界面右上角可以切换中文 / English / 日本語和深浅色。界面语言不影响身份:每个身份的语言跟它的代理出口走。
First launch
- When the cockpit opens, the local service starts on its own and listens only on
127.0.0.1:27933. The bottom left shows “Local service online”. - Under “What next” on the Workbench, click “Run local demo”. When it passes you see “First path verified”: the local service, the browser runtime and screenshots all work.
- Browser kernel: the Windows and Linux installers include the open-source Clearcote kernel, so windows open right away. On macOS, the first window downloads CloakBrowser from CloakHQ’s official channel to your computer and checks its signature.
- After you sign in, you can install Cohorta’s own 155 kernel (built on Chromium 155) under Integrations → Browser engine.
The top right switches between 中文 / English / 日本語 and light or dark. The interface language does not change identities: each identity’s language follows its proxy exit.
初回起動
- コックピットを開くとローカルサービスが自動で起動し、
127.0.0.1:27933でだけ待ち受ける。左下に「ローカルサービス稼働中」と出る。 - ワークベンチの「次に何をする」で「ローカルデモを実行」を押す。通ると「最初の経路を確認しました」と出る。ローカルサービス、ブラウザランタイム、スクリーンショットがすべて動いている。
- ブラウザカーネル:Windows と Linux のインストーラにはオープンソースの Clearcote カーネルが入っていて、すぐにウィンドウを開ける。macOS では最初のウィンドウを開くとき、CloakHQ の公式経路から CloakBrowser をダウンロードし、署名を検証する。
- ログイン後、「接続 → ブラウザエンジン」から同班独自の Cohorta 155 カーネル(Chromium 155 ベース)をインストールできる。
右上で 中文 / English / 日本語 とライト / ダークを切り替えられる。画面の言語は身分に影響しない。各身分の言語はプロキシの出口に合わせる。
账户、套餐和设备
- Hobby 免费:5 个身份、3 个并发窗口,不登录也能用。
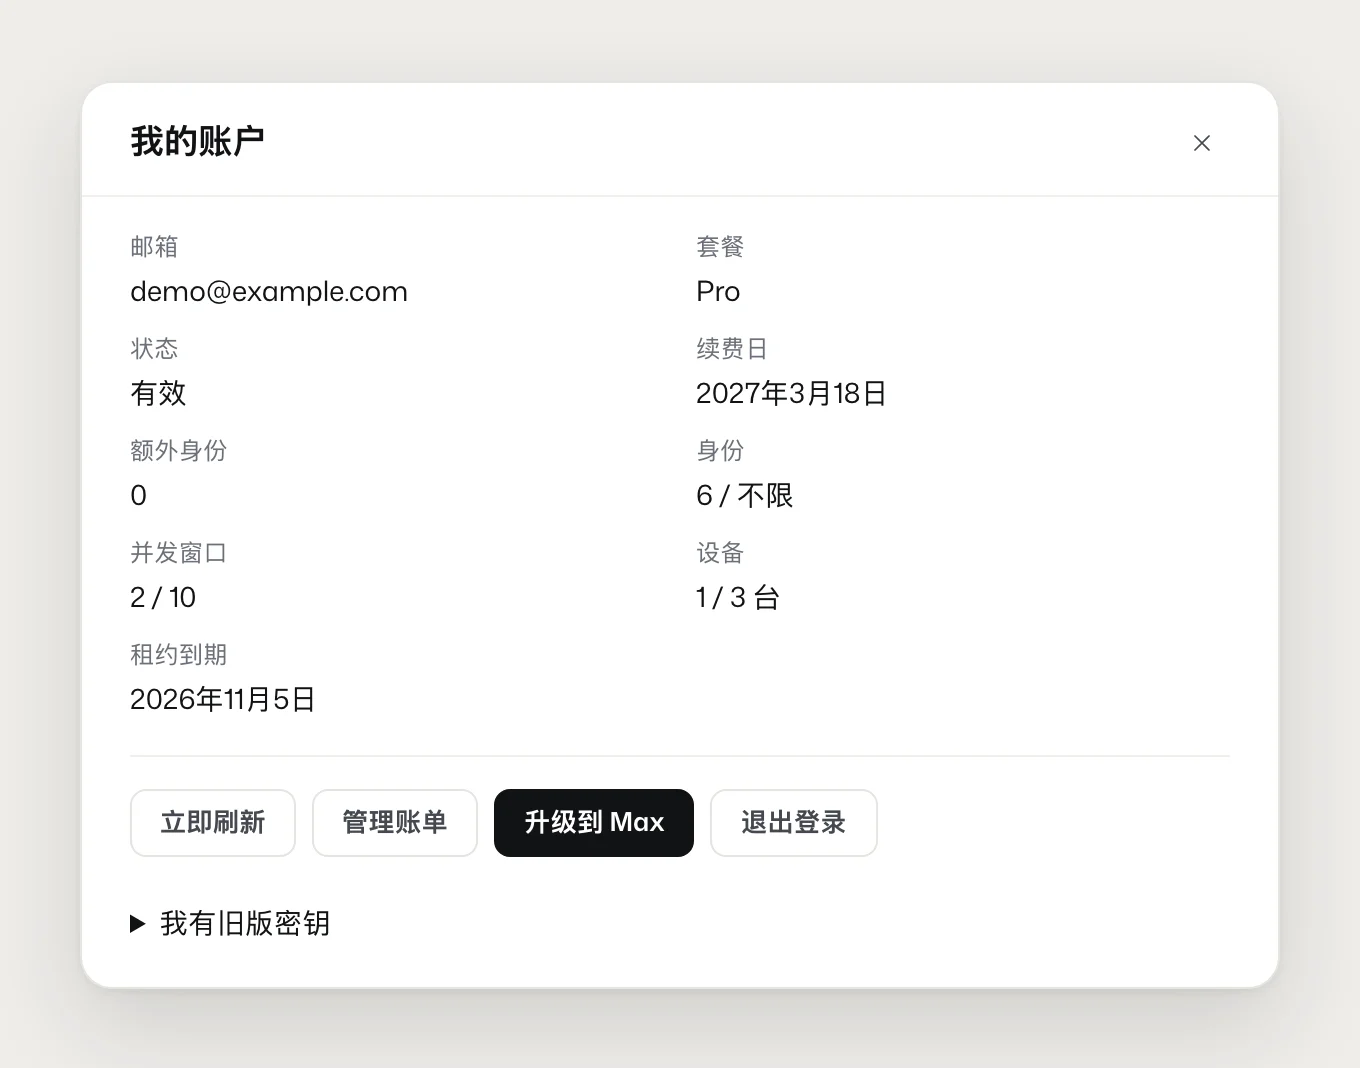
- 登录:点驾驶舱左下角的套餐标签,打开账户面板,点「登录」。浏览器会打开确认页,核对设备码后确认。终端里也可以运行
coh login。 - 购买:在本站登录后,到「我的账户」选 Pro($59/年,10 个并发窗口)、Max($149/年,30 个并发窗口)或额外身份。付款由 Waffo 处理。回到驾驶舱,授权会自动下发;想立刻生效可以运行
coh account refresh。 - 设备:授权每 14 天在线刷新一次。一个账户最多 3 台设备;换电脑时在「我的账户」里移除不用的设备(移除次数有限制)。
- 并发窗口:驾驶舱、
coh、Claude Code、Codex 打开的窗口都算在同一个计数里。 - 旧版密钥:
COH-/NOCT-密钥在 2027-01-31 前可以认领:登录后在账户面板点「我有旧版密钥」。
退款、续费和隐私见条款与隐私。
Account, plans, devices
- Hobby is free: 5 identities and 3 concurrent windows, no sign-in needed.
- Sign in: click the plan label at the bottom left of the cockpit to open the account panel, then click Sign in. Your browser opens a confirmation page. Check the device code and confirm. In a terminal you can run
coh logininstead. - Buy: sign in on this site, then in My account choose Pro ($59/year, 10 concurrent windows), Max ($149/year, 30 concurrent windows) or extra identities. Waffo handles payment. The cockpit picks up the grant on its own; run
coh account refreshto apply it right away. - Devices: the grant refreshes online every 14 days. An account covers up to 3 devices. When you change computers, remove the old one in My account (removals are limited).
- Concurrent windows: windows opened from the cockpit,
coh, Claude Code and Codex share one count. - Legacy keys:
COH-/NOCT-keys can be claimed until 2027-01-31. Sign in, then click “I have a legacy key” in the account panel.
Refunds, renewals and privacy are in Terms & privacy.
アカウント・プラン・デバイス
- Hobby は無料:身分 5 つ、同時ウィンドウ 3 つ。ログインなしで使える。
- ログイン:コックピット左下のプラン表示を押してアカウントパネルを開き、「ログイン」を押す。ブラウザに確認ページが開くので、デバイスコードを確かめて承認する。ターミナルでは
coh loginでもよい。 - 購入:このサイトでログインし、「マイアカウント」で Pro($59/年、同時ウィンドウ 10)、Max($149/年、同時ウィンドウ 30)、または追加身分を選ぶ。支払いは Waffo が処理する。コックピットには権限が自動で届く。すぐ反映したいときは
coh account refresh。 - デバイス:権限は 14 日ごとにオンラインで更新される。1 アカウント最大 3 台。PC を替えるときは「マイアカウント」で使わないデバイスを外す(外せる回数には上限がある)。
- 同時ウィンドウ:コックピット、
coh、Claude Code、Codex が開いたウィンドウは同じカウントに入る。 - 旧キー:
COH-/NOCT-キーは 2027-01-31 まで引き継げる。ログイン後、アカウントパネルで「旧キーを持っている」を押す。
返金、更新、プライバシーは規約とプライバシーへ。
创建身份
一个身份就是一套独立的浏览器环境:自己的数据目录、指纹、代理、时区和语言、Cookie。一个账号用一个身份。
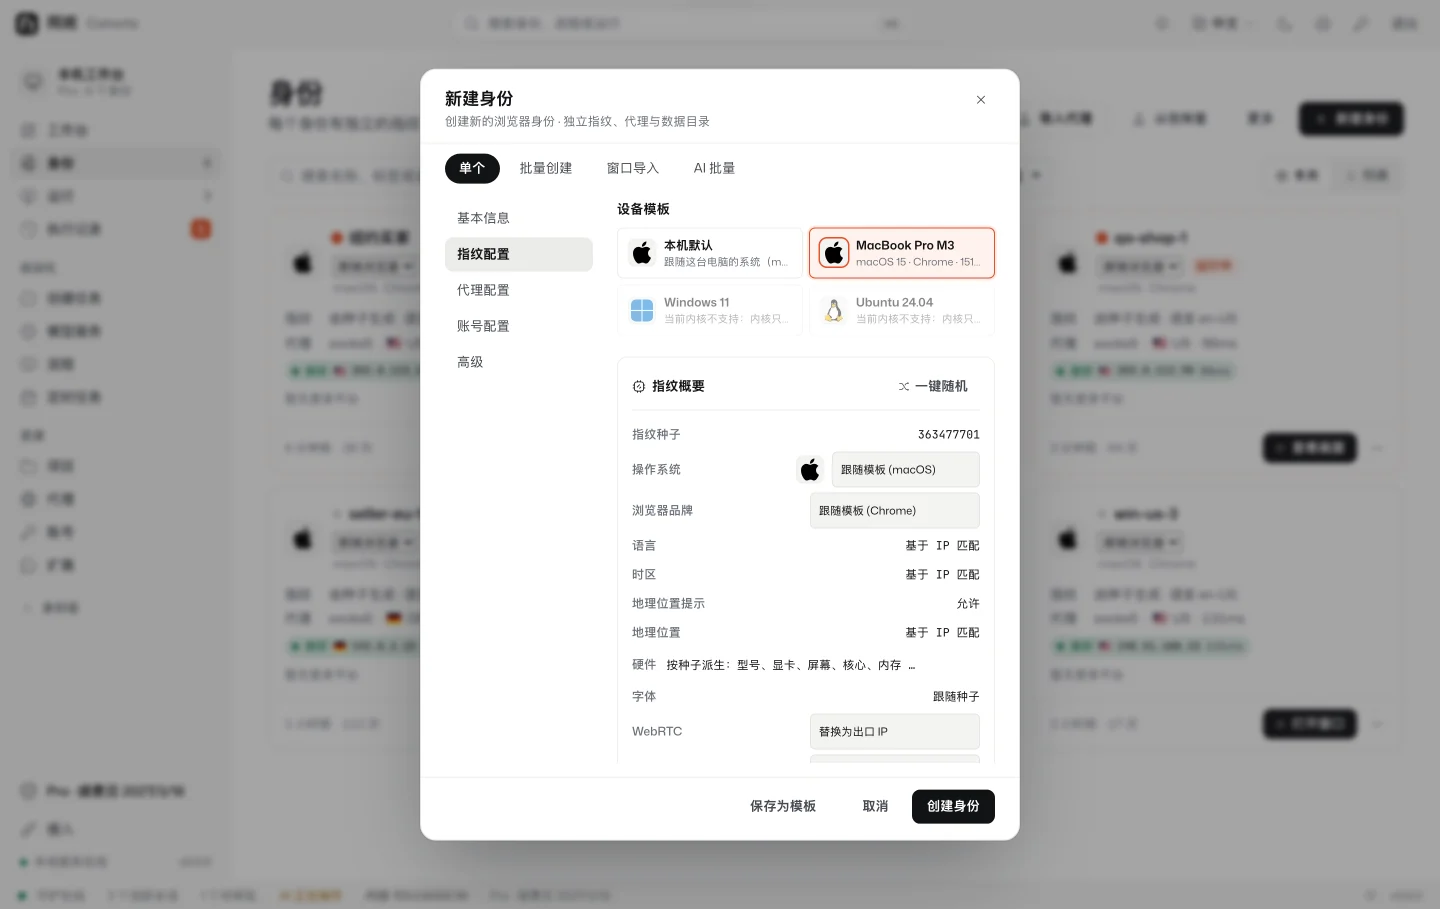
- 「身份」→「新建身份」。
- 基本信息:身份名称(Agent 用它找这个号,建议短而好认,例如
seller-eu-1)、项目、标签、备注。「我是谁 / 接下来做什么」写这个号的用途和边界,例如「美区买家 · 仅在 amazon.com 比价 · 不登录账号」,它会写进这个身份的 Skill。 - 指纹配置:选设备模板。「本机默认」跟随这台电脑的系统,最不容易露馅。系统、显卡、屏幕、UA 按模板和种子配成一套,不用逐项调。
- 代理配置:粘贴一行代理(
socks5://user:pass@host:port或host:port:user:pass),或从本机代理池选。默认「时区 / 语言跟随出口 IP」。 - 账号配置(可选):绑定已存的平台账号,或贴入导出的 Cookie。
- 点「创建身份」。之后会做一致性检查:出口 IP、时区、语言、WebRTC、显卡与系统是否对得上。没通过就按提示改。
批量:「批量创建」每行一个名字;「窗口导入」支持 .txt / .csv / .json(最大 5MB),可以下载导入模板。批量创建时可以从本机代理池轮询绑定。
身份菜单:打开、克隆(新指纹,不复制 Cookie)、重命名、编辑代理、导入 Cookie、导出身份包、反检测自检、删除(需要输入身份名确认,删除后无法恢复)。
Create identities
An identity is a separate browser environment: its own data folder, fingerprint, proxy, time zone and language, and cookies. Use one identity per account.
- Identities → New identity.
- Basics: identity name (agents find the account by it, so keep it short and clear, for example
seller-eu-1), project, tags and notes. Under “Who I am / what next”, write what the account is for and its limits, for example “US buyer · compare prices on amazon.com only · do not sign in”. This goes into the identity’s Skill. - Fingerprint: pick a device template. “This machine” follows your own system and is the least likely to stand out. The template and seed set OS, GPU, screen and UA together, so you do not tune them one by one.
- Proxy: paste one proxy line (
socks5://user:pass@host:portorhost:port:user:pass), or pick one from the local proxy pool. By default, time zone and language follow the exit IP. - Accounts (optional): bind a saved platform account, or paste exported cookies.
- Click Create identity. A consistency check follows: do exit IP, time zone, language, WebRTC, GPU and OS agree? If it fails, follow the hint.
In bulk: Create many takes one name per line. Import windows accepts .txt / .csv / .json up to 5MB, with a template you can download. Batch creation can bind proxies from the local pool in turn.
Identity menu: open, clone (new fingerprint, cookies not copied), rename, edit proxy, import cookies, export identity pack, anti-detection self-check, and delete (type the name to confirm; deletion cannot be undone).
身分を作る
身分は独立したブラウザ環境で、専用のデータフォルダ、指紋、プロキシ、タイムゾーンと言語、Cookie を持つ。1 アカウントに 1 身分。
- 「身分」→「身分を新規作成」。
- 基本情報:身分名(Agent はこの名前でアカウントを探すので、短く分かりやすく。例:
seller-eu-1)、プロジェクト、タグ、メモ。「自分は誰 / 次に何をする」に用途と範囲を書く。例:「米国の購入者 · amazon.com で価格比較のみ · ログインしない」。これは身分の Skill に入る。 - 指紋:デバイステンプレートを選ぶ。「本機に合わせる」は自分の OS に合わせるので最も目立ちにくい。OS、GPU、画面、UA はテンプレートとシードで一式そろうので、1 項目ずつ調整しなくてよい。
- プロキシ:プロキシを 1 行貼る(
socks5://user:pass@host:portまたはhost:port:user:pass)か、ローカルのプロキシプールから選ぶ。既定ではタイムゾーンと言語が出口 IP に合う。 - アカウント(任意):保存済みのプラットフォームアカウントを結び付けるか、エクスポートした Cookie を貼る。
- 「身分を作成」を押す。続いて整合性チェックが走り、出口 IP、タイムゾーン、言語、WebRTC、GPU と OS が合っているかを確かめる。通らなければ表示に従って直す。
一括:「一括作成」は 1 行に 1 つの名前。「ウィンドウ取り込み」は .txt / .csv / .json(最大 5MB)に対応し、テンプレートをダウンロードできる。一括作成ではローカルのプロキシプールから順番に割り当てられる。
身分メニュー:開く、複製(新しい指紋、Cookie はコピーしない)、名前変更、プロキシ編集、Cookie インポート、身分パックの書き出し、検知セルフチェック、削除(名前を入力して確認、元に戻せない)。
代理
- 「代理」→「添加代理 IP」,粘贴供应商给的一行即可识别:
host:port:user:pass、socks5://user:pass@host:port或http://…。 - 「测试全部代理」检查连通性和出口 IP。测通后再绑到身份。身份上的代理不通时,可以在身份菜单里换一条健康的代理。
- 一个身份固定用一个出口。按域名分流的代理(Clash 规则模式之类)会让不同网站看到不同 IP,和身份声明的时区、WebRTC IP 对不上;给浏览器单独开一个全局出口更稳。
- Cohorta 不提供代理网络本身,账单和续费在你的代理供应商那边。
coh proxy import proxies.txt     # 每行一条
coh proxy list
coh proxy assign seller-eu-1     # 从池里分配一条
Proxies
- Proxies → Add proxy IP. Paste the line your provider gave you and it is recognized:
host:port:user:pass,socks5://user:pass@host:portorhttp://…. - “Test all proxies” checks reachability and the exit IP. Bind a proxy to an identity after it passes. If an identity’s proxy dies, swap in a healthy one from the identity menu.
- Keep one exit per identity. Proxies that route by domain (Clash rule mode and similar) show different IPs to different sites, which then disagree with the identity’s time zone and WebRTC IP. A separate global exit for the browser is more reliable.
- Cohorta does not provide a proxy network. Billing and renewals stay with your proxy provider.
coh proxy import proxies.txt     # one per line
coh proxy list
coh proxy assign seller-eu-1     # assign one from the pool
プロキシ
- 「プロキシ」→「プロキシIPを追加」。プロバイダから受け取った 1 行を貼れば認識される:
host:port:user:pass、socks5://user:pass@host:port、http://…。 - 「全プロキシを検査」で接続と出口 IP を確認し、通ったものを身分に結び付ける。身分のプロキシが切れたら、身分メニューから正常なものに差し替えられる。
- 1 身分に 1 つの出口を固定する。ドメインごとに経路を分けるプロキシ(Clash のルールモードなど)では、サイトごとに見える IP が変わり、身分のタイムゾーンや WebRTC IP と合わなくなる。ブラウザ用にグローバルの出口を別に用意するほうが安定する。
- Cohorta はプロキシ網そのものは提供しない。請求と更新はプロキシのプロバイダ側で行う。
coh proxy import proxies.txt     # 1 行に 1 つ
coh proxy list
coh proxy assign seller-eu-1     # プールから 1 つ割り当て
打开窗口、观察和接管
- 在「身份」里点打开。同一个身份同时只开一个窗口,再点会回到已有的窗口。
- 「运行」看所有窗口的实时画面,可以切四路同屏、多列缩略图或大图。只是看画面,不会抢控制权。
- Agent 打开的有头窗口默认缩在屏幕角落,不抢焦点,不挡你手上的工作。点「接管」窗口放大,由你操作;点「交还」,Agent 从这里接着做。
- 关闭单个窗口,或「关闭全部」。由 Agent 控制的窗口关闭前会再确认一次,关掉后不会自动重开。
coh open seller-eu-1 --headed     # 打开有界面的窗口
coh sessions list
coh sessions takeover <会话 id>     # 人接管
coh sessions release <会话 id>      # 交还给 Agent
Windows, watching, takeover
- Open an identity from Identities. Each identity has at most one window at a time; opening it again brings back the existing one.
- Runs shows every window live, as four-up, a thumbnail grid or a large view. Watching never takes control.
- Headed windows that an agent opens sit small in a screen corner by default. They do not steal focus or cover your work. Click Take over to enlarge the window and drive it yourself; click “Hand back to agent” and the agent carries on from there.
- Close one window or use Close all. Windows under agent control ask once more before closing and do not reopen on their own.
coh open seller-eu-1 --headed     # open a visible window
coh sessions list
coh sessions takeover <session id>   # you take control
coh sessions release <session id>    # hand back to the agent
ウィンドウ・観察・交代
- 「身分」から開く。1 つの身分で同時に開けるウィンドウは 1 つだけで、もう一度開くと既存のウィンドウに戻る。
- 「実行」で全ウィンドウをライブで見られる。4 分割、複数列のサムネイル、大画面を切り替えられる。見ているだけでは操作権を取らない。
- Agent が開く表示ありのウィンドウは、既定で画面の隅に小さく置かれ、フォーカスを奪わず作業の邪魔をしない。「引き継ぐ」で拡大して自分が操作し、「agentに返す」と Agent がそこから続ける。
- ウィンドウを 1 つずつ、または「すべて閉じる」で閉じる。Agent が操作中のウィンドウは閉じる前にもう一度確認し、閉じた後は自動で開き直さない。
coh open seller-eu-1 --headed     # 表示ありで開く
coh sessions list
coh sessions takeover <セッション id>   # 人が交代
coh sessions release <セッション id>    # Agent に返す
平台账号和登录态
- 「账号」保存平台登录信息:用户名或邮箱、密码、可选的 TOTP 密钥、限定网站。加密保存在本机,按身份绑定,不做云同步。支持单个添加、批量粘贴(
账号----密码----2FA----备注)和表格导入。 - Cookie 从身份菜单「导入 Cookie」导入:支持导出的登录态 JSON、Cookie 数组、Netscape 格式和
Name=Value。 - 身份菜单也能导出登录态,换电脑或备份时用。
Saved logins and cookies
- Accounts stores platform logins: username or email, password, an optional TOTP secret and the sites it applies to. They are encrypted on this computer, bound per identity, and never synced to a cloud. Add one at a time, paste a batch (
account----password----2FA----notes) or import a table. - Import cookies from the identity menu. It accepts exported login-state JSON, a cookie array, Netscape format and
Name=Value. - The identity menu can also export the login state, for a new computer or a backup.
アカウントとログイン状態
- 「アカウント」にプラットフォームのログイン情報を保存する:ユーザー名かメール、パスワード、任意の TOTP シークレット、対象サイト。この PC で暗号化して保存し、身分ごとに結び付け、クラウドには同期しない。1 件ずつ、まとめて貼り付け(
アカウント----パスワード----2FA----メモ)、表のインポートに対応する。 - Cookie は身分メニューの「Cookieを取り込む」から入れる。エクスポートしたログイン状態 JSON、Cookie 配列、Netscape 形式、
Name=Valueに対応する。 - 身分メニューからログイン状態をエクスポートすることもでき、PC の移行やバックアップに使える。
接入 Claude Code / Codex / Cursor
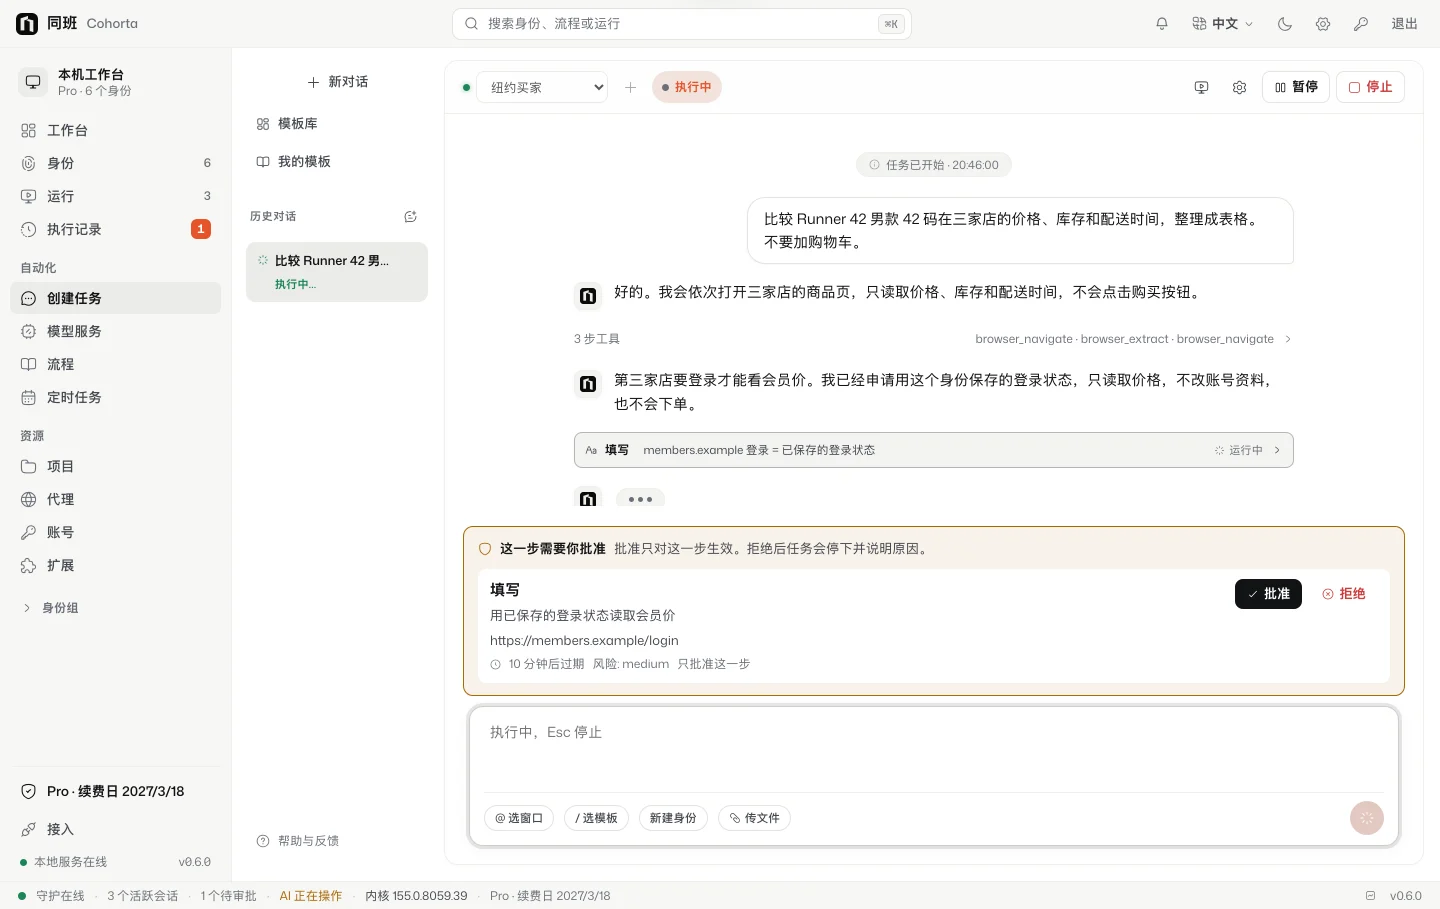
- 本地服务启动时会自动做两件事:把
coh命令放进~/.cohorta/bin并加到终端 PATH;给本机已经装好的 Claude Code、Codex、Cursor 装上 Cohorta Skill。 - 重新打开终端,运行
coh install status确认。「接入」页也会显示每个客户端的状态。状态不对时运行coh install repair。 - 直接对 Agent 说要做的事,并点名身份,例如「用 seller-eu-1 打开后台,导出今天的订单」。Agent 会调用
coh,窗口出现在驾驶舱的「运行」里。
- 每个身份有自己的 Skill:名字、地区、典型任务,命令已经绑在这个身份上,Agent 不容易开错号。改了「我是谁 / 接下来做什么」之后,在身份详情里重新整理并安装 Skill,或运行
coh profile skill seller-eu-1 --install --target all。 - Agent 启动的
coh按自动化权限运行:发帖、付款这类步骤仍要你确认,也不能导出完整 Cookie。 - 默认不注册 MCP。自己的脚本可以用本机 API(
127.0.0.1:27933,请求要带X-Coh-Token),地址、Token 和 Python / Node 示例在「接入」页复制。
Connect Claude Code / Codex / Cursor
- When the local service starts, it does two things on its own: it puts the
cohcommand in~/.cohorta/binand adds that to your terminal PATH, and it installs the Cohorta Skill into Claude Code, Codex and Cursor if they are installed. - Open a new terminal and run
coh install statusto confirm. The Integrations page also shows each client’s status. If something is off, runcoh install repair. - Tell the agent what to do and name the identity, for example “Open the admin page with seller-eu-1 and export today’s orders.” The agent calls
coh, and the window appears under Runs in the cockpit.
- Each identity has its own Skill: name, region, typical tasks, and commands already bound to that identity, so agents rarely open the wrong account. After you change “Who I am / what next”, rebuild and install the Skill from the identity details, or run
coh profile skill seller-eu-1 --install --target all. cohstarted by an agent runs with automation rights: posting and paying still wait for you, and it cannot export full cookies.- MCP is not registered by default. Your own scripts can use the local API (
127.0.0.1:27933, requests needX-Coh-Token). Copy the address, token and Python / Node examples from the Integrations page.
Claude Code / Codex / Cursor を接続
- ローカルサービスは起動時に 2 つのことを自動で行う。
cohコマンドを~/.cohorta/binに置いてターミナルの PATH に加えること、そしてインストール済みの Claude Code、Codex、Cursor に Cohorta Skill を入れること。 - ターミナルを開き直し、
coh install statusで確認する。「接続」ページにも各クライアントの状態が出る。おかしいときはcoh install repair。 - やりたいことを身分名付きで Agent に伝える。例:「seller-eu-1 で管理画面を開いて今日の注文をエクスポートして」。Agent が
cohを呼び、ウィンドウはコックピットの「実行」に現れる。
- 各身分に専用の Skill がある:名前、地域、典型タスク、そしてこの身分に固定されたコマンド。Agent がアカウントを取り違えにくい。「自分は誰 / 次に何をする」を変えたら、身分の詳細から Skill を作り直して入れるか、
coh profile skill seller-eu-1 --install --target allを実行する。 - Agent が起動した
cohは自動化の権限で動く。投稿や支払いは引き続き確認待ちになり、完全な Cookie はエクスポートできない。 - MCP は既定で登録しない。自分のスクリプトからはローカル API(
127.0.0.1:27933、リクエストにX-Coh-Tokenが必要)を使える。アドレス、トークン、Python / Node の例は「接続」ページでコピーできる。
在驾驶舱里创建任务
不用外部 Agent,也可以在驾驶舱里直接下达任务。
- 「模型服务」里添加一个模型服务并启用。可以加多个,一键切换。key 只加密保存在本机,界面只显示打码值。
- 「创建任务」选身份,等这个身份的窗口打开、页面加载完,再用一句话描述任务。
- 任务进行中可以「暂停」「继续」「停止」。停止后浏览器动作也停下,已有记录不会丢。
- 跑通以后点「存为流程草稿」,下次按固定步骤回放。
一个身份同时只跑一个 Agent。要并行,点「新对话」再选另一个身份。
Create tasks in the cockpit
You can also give tasks inside the cockpit without an outside agent.
- Add a model service under Model services and turn it on. You can add several and switch with one click. Keys are encrypted on this computer and only shown masked.
- In New task, pick an identity, wait for its window to open and the page to load, then describe the task in a sentence.
- While it runs you can Pause, Continue or Stop. Stopping also stops the browser, and the record so far is kept.
- When it works, click “Save flow draft” to replay the same steps next time.
Each identity runs one agent at a time. To work in parallel, click New chat and pick another identity.
コックピットでタスクを作る
外部の Agent を使わず、コックピットから直接タスクを頼むこともできる。
- 「モデルサービス」でモデルサービスを追加して有効にする。複数登録してワンクリックで切り替えられる。キーはこの PC で暗号化して保存し、画面には伏せ字でだけ表示する。
- 「タスクを作成」で身分を選び、その身分のウィンドウが開いてページが読み込まれるのを待ってから、タスクを 1 文で書く。
- 実行中は「一時停止」「続ける」「停止」ができる。停止するとブラウザ操作も止まり、それまでの記録は残る。
- うまくいったら「レシピ下書きとして保存」を押し、次回は同じ手順で再生する。
1 つの身分で同時に動く Agent は 1 つ。並行させるには「新しい会話」で別の身分を選ぶ。
审批:危险步骤等你确认
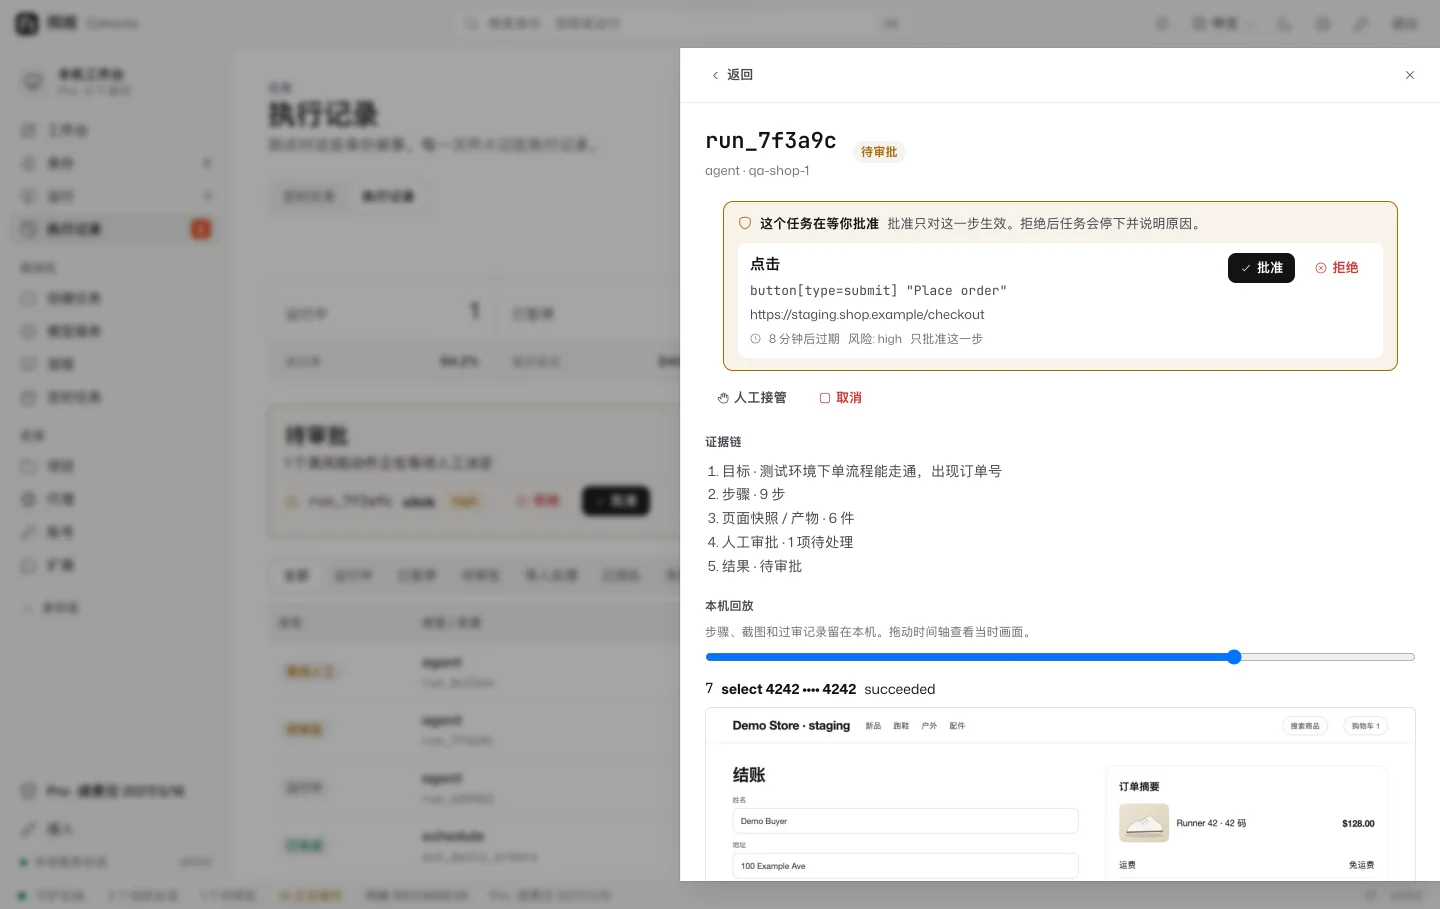
- 发帖、付款、提交表单、注册账号这类步骤默认停下,出现在工作台「需要你处理」和执行记录里,并标出风险和过期时间。
- 「批准」只对这一步生效。「拒绝」后任务停下并写明原因。也可以「人工接管」,自己完成这一步再交还。
- 自动发布默认关闭,需要按账号单独开启,开启后每次发布前默认仍先问你。生成不等于发布。
coh approval list
coh approval decide <审批 id> approve     # 或 reject
Approvals for risky steps
- Posting, paying, submitting forms and registering accounts stop by default. They appear under “Needs you” on the Workbench and in the run record, with the risk and an expiry time.
- Approve applies to that one step only. Reject stops the task and records why. You can also take over, do the step yourself, and hand back.
- Auto-publishing is off by default and is turned on per account. Even then, it asks before each post by default. Generating is not publishing.
coh approval list
coh approval decide <approval id> approve     # or reject
承認:危険な手順は確認待ち
- 投稿、支払い、フォーム送信、アカウント登録などの手順は既定で止まり、ワークベンチの「対応が必要」と実行記録に、リスクと期限付きで表示される。
- 「承認」はその 1 手順にだけ効く。「却下」するとタスクは止まり、理由が記録される。「人手で引き継ぐ」で自分でその手順を済ませ、返すこともできる。
- 自動公開は既定でオフで、アカウントごとにオンにする。オンでも既定では毎回公開前に確認する。生成は公開ではない。
coh approval list
coh approval decide <承認 id> approve     # または reject
执行记录和证据
- 每次运行都留下证据链:目标、步骤、页面快照和截图、人工审批、结果。
- 「本机回放」拖动时间轴,看每一步当时的页面,方便找出在哪一步失败。
- 记录只存在本机,不上传。
coh runs list
coh runs show <运行 id>
Run records and evidence
- Every run keeps an evidence chain: goal, steps, page snapshots and screenshots, human approvals, and the result.
- Local replay lets you drag a timeline to see the page at each step, so you can find the step that failed.
- Records stay on this computer and are not uploaded.
coh runs list
coh runs show <run id>
実行記録と証拠
- 実行ごとに証拠チェーンが残る:目標、手順、ページのスナップショットとスクリーンショット、人による承認、結果。
- 「ローカル再生」でタイムラインをドラッグすると、各手順のときのページが見られ、どこで失敗したかを探せる。
- 記録はこの PC にだけ保存し、アップロードしない。
coh runs list
coh runs show <実行 id>
流程:录一次,回放不花 token
- 流程(recipe)是固定的浏览器步骤。回放时不调用模型,不花 token。
- 来源:「创建任务」里的「存为流程草稿」;用
coh runs recipe把一次成功的运行存成流程;或让 Agent 用coh recipe record-start和coh recipe save录制。 - 「流程」页能看到每条流程的步骤、版本和验证证据。「验证并审批发布」会先预演(浏览器动作不执行),通过后发布一个不可变的版本,出问题可以回滚。
- 内置几条可以直接用的流程,例如
check-exit-ip(查出口 IP 和 UA,用来核对代理和指纹)。
coh recipe list
coh recipe run export-orders --profile seller-eu-1
coh batch run --recipe check-exit-ip --group shops --dry-run   # 先演练
coh batch run --recipe check-exit-ip --group shops             # 再正式跑
Flows: record once, replay free
- A flow (recipe) is a fixed set of browser steps. Replaying it calls no model and costs no tokens.
- Where recipes come from: “Save flow draft” in New task;
coh runs recipeto save a successful run; or an agent recording withcoh recipe record-startandcoh recipe save. - The Flows page shows each flow’s steps, versions and validation evidence. “Validate and approve publish” first does a dry run (no browser actions), then publishes an immutable version. You can roll back if something goes wrong.
- A few built-in recipes are ready to use, for example
check-exit-ip(shows exit IP and UA, to check a proxy and fingerprint).
coh recipe list
coh recipe run export-orders --profile seller-eu-1
coh batch run --recipe check-exit-ip --group shops --dry-run   # rehearse first
coh batch run --recipe check-exit-ip --group shops             # then for real
フロー:一度記録、再生は無料
- フロー(recipe)は決まったブラウザ手順。再生時はモデルを呼ばず、トークンもかからない。
- 作り方:「タスクを作成」の「レシピ下書きとして保存」、
coh runs recipeで成功した実行を保存、または Agent にcoh recipe record-startとcoh recipe saveで記録させる。 - 「フロー」ページで各フローの手順、バージョン、検証の証拠を見られる。「検証して v… の公開を承認」はまず予行(ブラウザ操作はしない)を行い、通れば変更不可のバージョンを公開する。問題があればロールバックできる。
- すぐ使える組み込みレシピもある。例:
check-exit-ip(出口 IP と UA を確認し、プロキシと指紋を点検する)。
coh recipe list
coh recipe run export-orders --profile seller-eu-1
coh batch run --recipe check-exit-ip --group shops --dry-run   # まず予行
coh batch run --recipe check-exit-ip --group shops             # 本番
定时任务(Pro)
- 「定时任务」→「新建定时任务」:选身份或身份组,选流程或 Agent 目标,选每天几点。时区默认上海,可以改。
- 流程到点自动跑。Agent 目标到点只排队,不会自己调用大模型;用本机 Skill 或「创建任务」执行。
- 「现在跑一次」立刻触发一次。结果在执行记录里。
- 定时任务需要 Pro 或 Max。Hobby 不会调度已有的定时任务。
coh schedule list
coh schedule run-now <计划 id>
Schedules (Pro)
- Schedules → New schedule: pick identities or a group, a recipe or an agent goal, and a time of day. The time zone defaults to Shanghai and can be changed.
- Recipes run on their own at that time. Agent goals only queue at that time and never call a model by themselves; run them with the local Skill or New task.
- “Run once now” triggers one run right away. Results appear in run records.
- Schedules need Pro or Max. Hobby does not run existing schedules.
coh schedule list
coh schedule run-now <schedule id>
定期タスク(Pro)
- 「定期タスク」→「定期タスクを新規作成」:身分または身分グループ、レシピまたは Agent の目標、毎日の時刻を選ぶ。タイムゾーンの既定は上海で、変更できる。
- レシピは時刻になると自動で動く。Agent の目標は時刻になってもキューに入るだけで、自分からモデルを呼ばない。ローカルの Skill か「タスクを作成」で実行する。
- 「今すぐ1回」ですぐに 1 回動かせる。結果は実行記録に出る。
- 定期タスクには Pro か Max が必要。Hobby では既存の定期タスクも動かない。
coh schedule list
coh schedule run-now <計画 id>
项目和扩展
项目
「项目」把窗口和身份按项目归组。项目里可以写内容草稿,把角色绑到身份上,让多个 Agent 分工。生成不等于发出。删除项目只会丢掉草稿,身份不会被删除。命令行见 coh project --help。
扩展
「扩展」里填本机 .crx 文件或解压后的扩展目录,勾选一批身份点「套用到勾选身份」。要从 Chrome 商店装,点「在独立窗口打开商店」,在这个身份的窗口里点「添加至 Chrome」,扩展会写进该身份。
Projects and extensions
Projects
Projects group windows and identities. Inside a project you can write content drafts and bind roles to identities so several agents split the work. Generating is not sending. Deleting a project only discards its drafts; identities are not deleted. For the CLI, see coh project --help.
Extensions
In Extensions, enter a local .crx file or an unpacked extension folder, tick a set of identities and click “Apply to checked identities”. To install from the Chrome Web Store, click “Open the store in a separate window” and click “Add to Chrome” in that identity’s window; the extension is saved to that identity.
プロジェクトと拡張機能
プロジェクト
「プロジェクト」はウィンドウと身分をプロジェクトごとにまとめる。プロジェクト内でコンテンツの下書きを書き、役割を身分に結び付けて複数の Agent で分担できる。生成は送信ではない。プロジェクトを削除しても消えるのは下書きだけで、身分は削除されない。CLI は coh project --help を参照。
拡張機能
「拡張」でローカルの .crx ファイルか展開済みの拡張フォルダを指定し、身分をまとめて選んで「選んだ身分に適用」を押す。Chrome ウェブストアから入れるときは、「独立ウィンドウでストアを開く」を押し、その身分のウィンドウで「Chrome に追加」を押すと、拡張機能がその身分に保存される。
数据、备份和卸载
- 所有数据都在本机的
~/.cohorta(Windows 是%USERPROFILE%\.cohorta):身份、代理、账号、流程、执行记录。 - 备份或迁移身份:身份菜单「导出身份包」,在新电脑上「从包恢复」;命令行
coh profile export seller-eu-1/coh profile import 文件。身份包不含浏览器数据目录,登录态请另外用「导出登录态」。 - 卸载前先运行
coh install uninstall,删掉装进 Agent 的 Skill。 - 卸载:macOS 把「应用程序」里的 Cohorta 移到废纸篓,再删
~/Library/LaunchAgents/com.cohorta.daemon.plist登录项;Windows 在「设置 → 应用」里卸载;Linux 运行sudo apt remove cohorta,或直接删掉 AppImage。 - 卸载不会删
~/.cohorta。要彻底清除,先退出驾驶舱,再删除这个目录。删除后无法恢复。
Data, backup, uninstall
- All data lives on this computer in
~/.cohorta(on Windows,%USERPROFILE%\.cohorta): identities, proxies, accounts, recipes and run records. - To back up or move an identity, use “Export identity pack” in the identity menu and “Restore from pack” on the new computer, or
coh profile export seller-eu-1/coh profile import FILE. The pack does not include the browser data folder; export the login state separately. - Before uninstalling, run
coh install uninstallto remove the Skills installed into your agents. - Uninstall: on macOS, move Cohorta from Applications to the Trash and delete the login item
~/Library/LaunchAgents/com.cohorta.daemon.plist. On Windows, uninstall in Settings → Apps. On Linux, runsudo apt remove cohorta, or delete the AppImage. - Uninstalling keeps
~/.cohorta. To remove everything, quit the cockpit and delete that folder. This cannot be undone.
データ・バックアップ・アンインストール
- データはすべてこの PC の
~/.cohorta(Windows は%USERPROFILE%\.cohorta)にある:身分、プロキシ、アカウント、レシピ、実行記録。 - 身分のバックアップや移行は、身分メニューの「身分パックを書き出す」と、新しい PC での「パックから復元」で行う。CLI では
coh profile export seller-eu-1/coh profile import ファイル。パックにブラウザのデータフォルダは入らないので、ログイン状態は別にエクスポートする。 - アンインストールの前に
coh install uninstallを実行し、Agent に入れた Skill を削除する。 - アンインストール:macOS は「アプリケーション」の Cohorta をゴミ箱に移し、ログイン項目
~/Library/LaunchAgents/com.cohorta.daemon.plistを削除する。Windows は「設定 → アプリ」から。Linux はsudo apt remove cohorta、または AppImage を削除する。 - アンインストールしても
~/.cohortaは残る。完全に消すには、コックピットを終了してからこのフォルダを削除する。元に戻せない。
常见问题排查
- 左下角显示「本地服务未连接」
- 退出并重新打开 Cohorta。仍然不行,在终端运行
coh doctor看是哪一项没通过。 - 窗口无响应或崩溃
- 点「重启窗口」,其他窗口不受影响。内核进程还残留时运行
coh sessions kill-orphans。 - 提示「这个身份被锁占用」
- 先关掉这个身份的窗口;本地服务卡住时运行
coh sessions kill-orphans后重试。 - 代理认证失败
- 在身份菜单「编辑代理」核对用户名和密码,或换一条代理。
- 提示可用内存不足
- 关掉一些窗口,分批打开。
- 提示被并发窗口上限挡住
- 提示里会写明当前用量和上限。关掉一些窗口,或在账户面板查看套餐。
- Agent 找不到
coh - 重新打开终端;还不行就运行
~/.cohorta/bin/coh install repair。 - 还是解决不了
- 在「接入」页点「复制诊断」,连同问题描述发到 support@elidot.com。诊断不含密码和 key。
Troubleshooting
- The bottom left says “Local service offline”
- Quit and reopen Cohorta. If it persists, run
coh doctorin a terminal to see which check fails. - A window stops responding or crashes
- Click Restart window; other windows are unaffected. If kernel processes are left over, run
coh sessions kill-orphans. - “This identity’s profile is locked”
- Close that identity’s window first. If the local service is stuck, run
coh sessions kill-orphansand retry. - Proxy authentication failed
- Check the username and password under Edit proxy in the identity menu, or switch to another proxy.
- Not enough free memory
- Close some windows and open them in batches.
- Blocked by the concurrent-window limit
- The message shows current usage and the limit. Close some windows, or check your plan in the account panel.
- The agent cannot find
coh - Open a new terminal. If that does not help, run
~/.cohorta/bin/coh install repair. - Still stuck
- Click “Copy diagnostics” on the Integrations page and email it with a description of the problem to support@elidot.com. Diagnostics contain no passwords or keys.
トラブルシューティング
- 左下に「ローカルサービス未接続」と出る
- Cohorta を終了して開き直す。直らなければターミナルで
coh doctorを実行し、どの項目が通らないかを見る。 - ウィンドウが応答しない・クラッシュした
- 「ウィンドウを再起動」を押す。他のウィンドウには影響しない。カーネルのプロセスが残っていれば
coh sessions kill-orphans。 - 「この身分はロックされています」と出る
- まずその身分のウィンドウを閉じる。ローカルサービスが固まっているときは
coh sessions kill-orphansの後に再試行する。 - プロキシ認証に失敗する
- 身分メニューの「プロキシを編集」でユーザー名とパスワードを確かめるか、別のプロキシに替える。
- 空きメモリが足りない
- いくつかウィンドウを閉じ、分けて開く。
- 同時ウィンドウの上限に当たった
- メッセージに現在の使用量と上限が出る。ウィンドウを閉じるか、アカウントパネルでプランを確認する。
- Agent が
cohを見つけられない - ターミナルを開き直す。それでも駄目なら
~/.cohorta/bin/coh install repair。 - それでも解決しない
- 「接続」ページで「診断をコピー」を押し、問題の説明と一緒に support@elidot.com へ送る。診断にパスワードやキーは含まれない。